 In the late 1800s the French town of Lamotte-Beuvron (south of Paris near Orléans) was known for rustic apple tarts. The best was baked by sisters Stéphanie and Caroline Tatin who ran an inn near the railway station. It’s not clear how Stéphanie first made an upside down apple tart but it is clear that word spread about how good they were. Curnonsky, the well-known epicurean and writer of the time ventured from Paris to try it and later wrote about it after the sisters’ deaths.
It all begins with a Tarte Tatin pan which is a pan that can be heated both on top of the stove and in the oven. I’m fortunate to have a special Mauviel copper pan from France that my parents gave me many years ago. If you don’t have one, fear not, you can use a cast-iron skillet or any other round pan that can go on top of the stove and in the oven. Don’t rush off to buy a pan as they are quite expensive – make a tarte first and if you fall in love with it (there’s a good chance you just might) then invest in a pan.
The dough needs to chill for a few hours, so make sure you prepare it at least two hours in advance or even overnight. This is the only recipe that I make that calls for vegetable shortening (aka Crisco). Using a combination of butter and vegetable shortening makes for a flakier crust.
Not all apples are created equal as some are better for baking. I’d recommend Granny Smith, Golden Delicious or Pink Lady (seen in the picture). The apples are cooked on top of the stove in butter and sugar (aka caramel) until a bit soft. When they are almost done, roll out the crust and carefully place it on top of the apples, tucking it in around the sides. If the dough doesn’t look quite perfect, it’s okay as it will be on the bottom of the tarte. Take extra care not to burn your fingers. Put it in the oven and sit back and enjoy the wonderful smell.
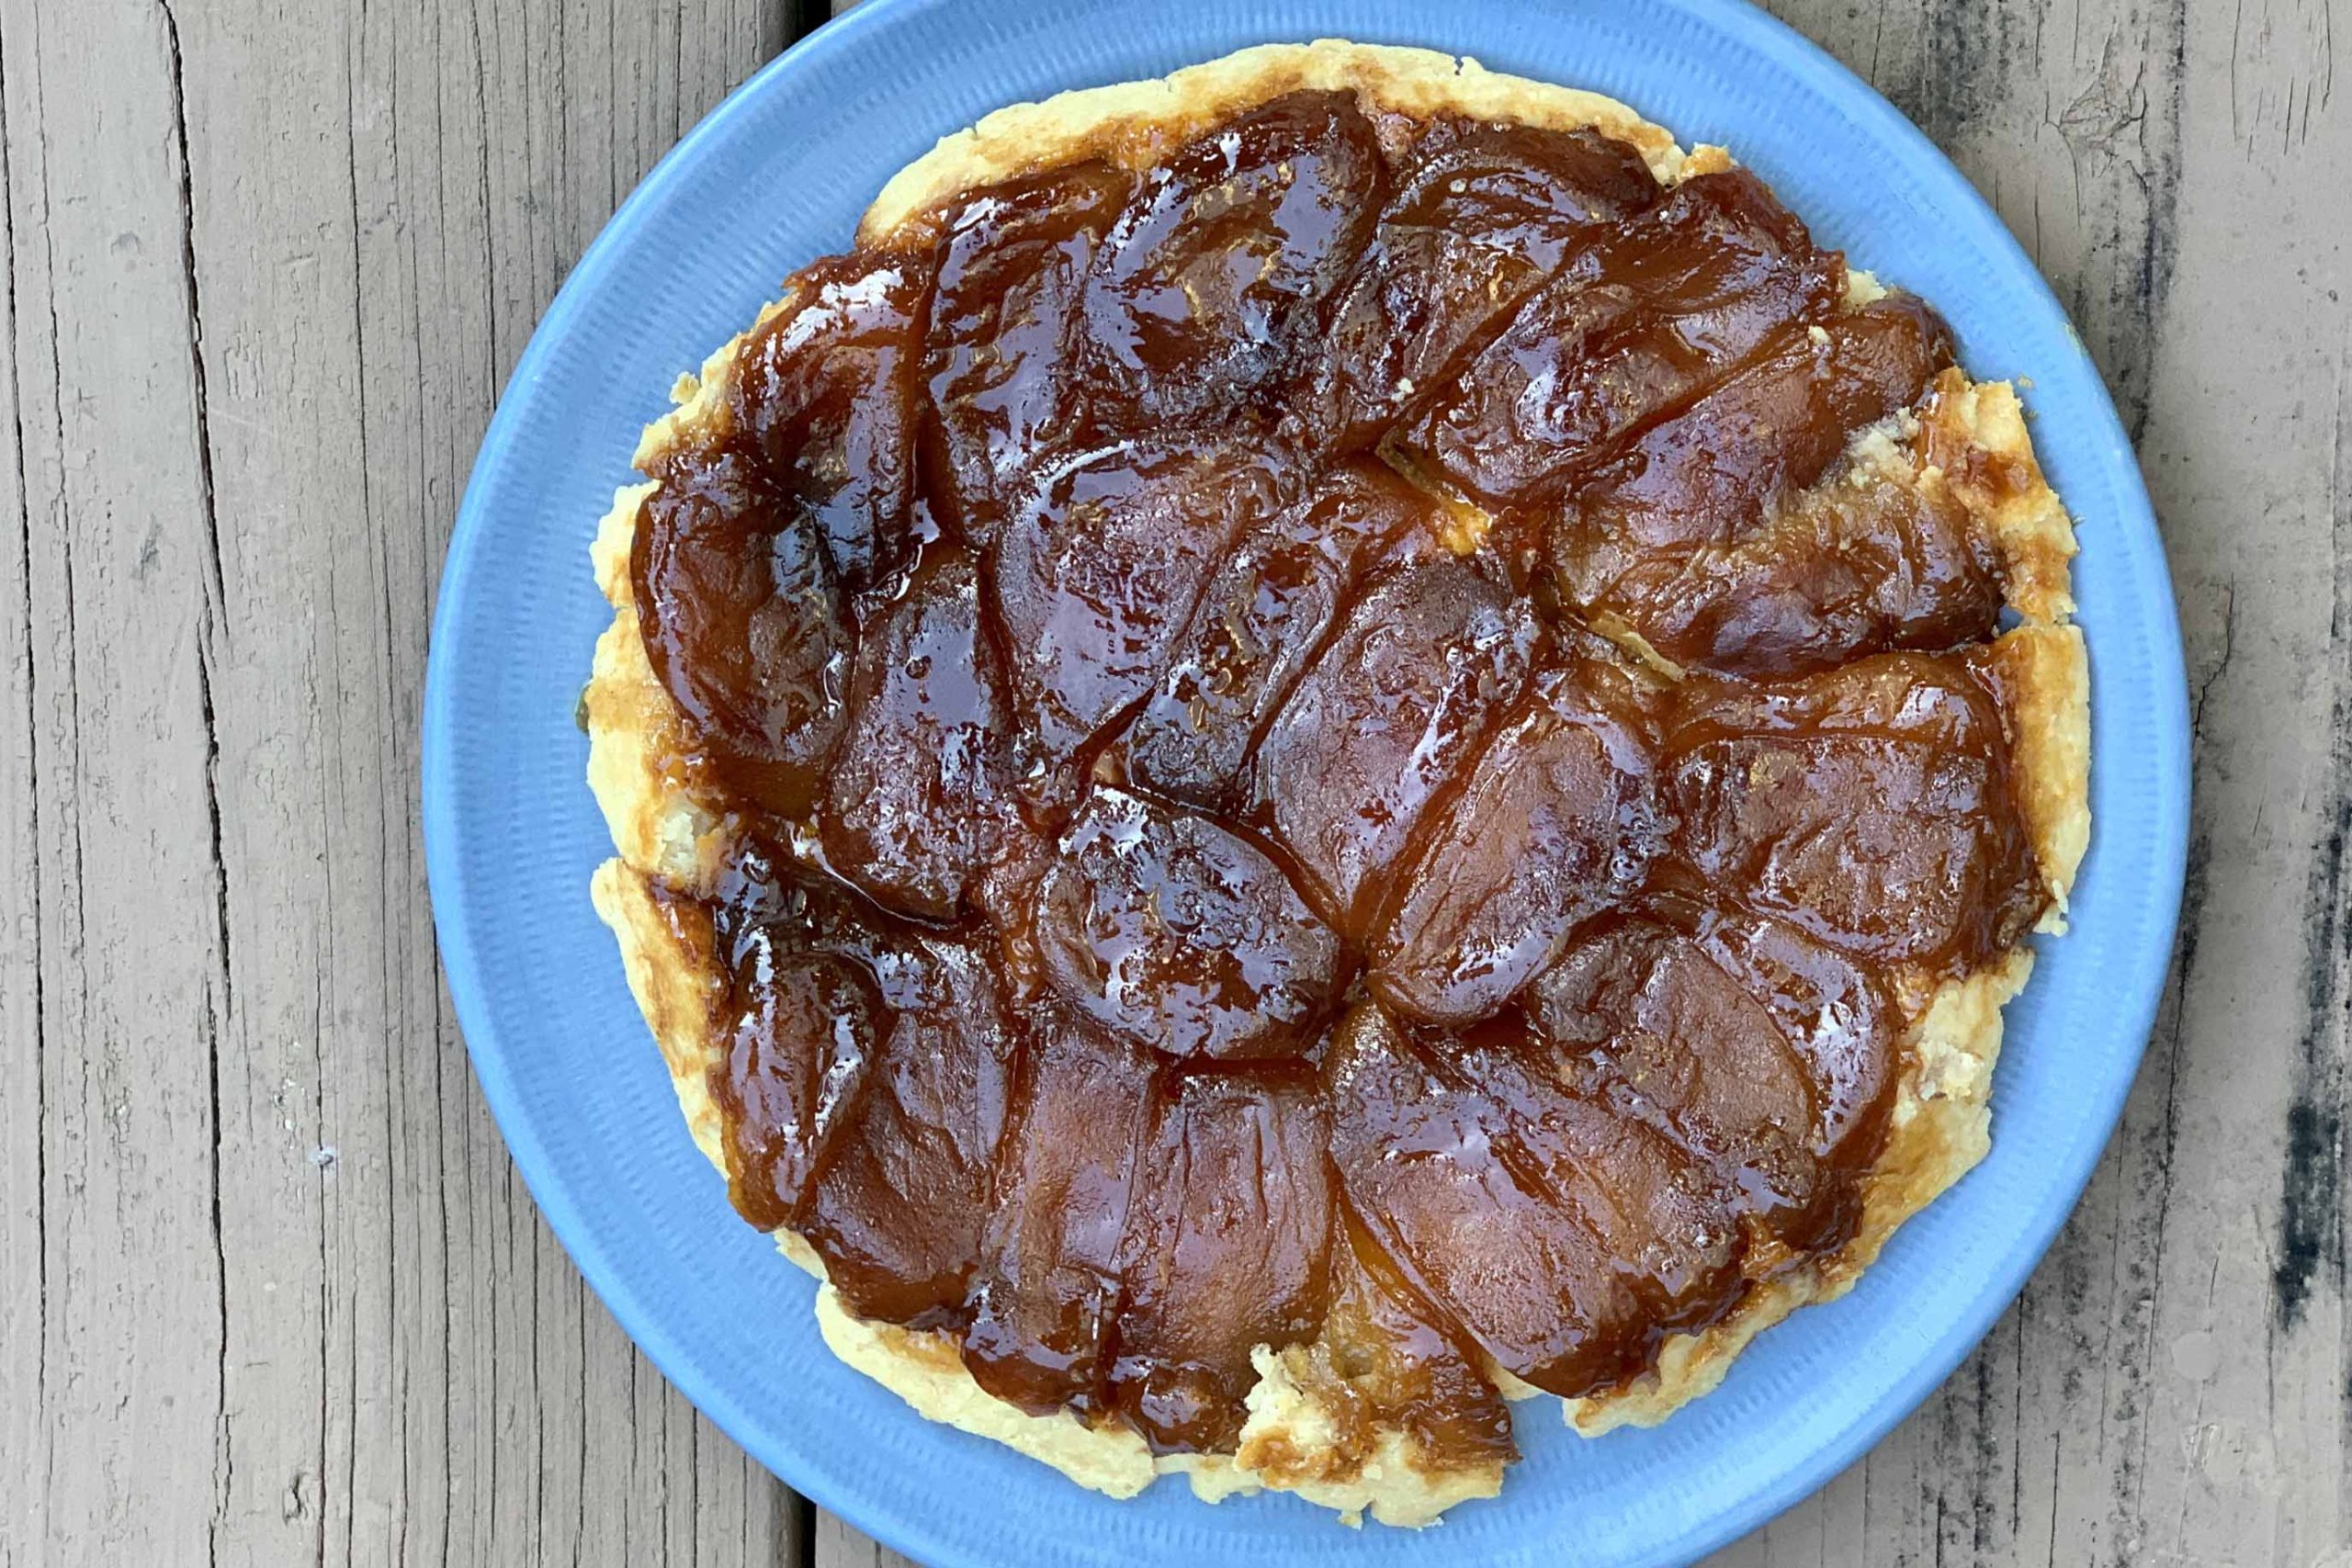
The tarte is done when the crust is golden brown. Let it cool for a few minutes on a wire rack. Place a decorative plate (one that can withstand some heat) on top of the pan and invert the pan releasing the tarte. This treat is wonderful served warm but also good at room temperature. A bit of vanilla ice cream always makes things better.
I recommend using regular butter – not European butter – for both the crust and the filling. The higher butterfat content in European butter doesn’t work for this recipe (trust me, I tried it!).
A Tarte Tatin isn’t as robust as a traditional apple pie. Some of you may be planning smaller holiday gatherings this year so perhaps this would be a perfect dessert? It serves eight people, but the pieces are small…
A traditional Tarte Tatin is made with apples, so my title may be a bit redundant. However I didn’t want to assume that everyone knew what a Tarte Tatin was. These lovely Pink Lady apples were grown by Sunny Acres Farm and the non-GMO all-purpose flour came from Deer Creek Malthouse – both procured at the Growing Roots Farmers Market in Malvern, PA.

Apple Tarte Tatin
Ingredients
Dough
- 1-1/4 cups all-purpose flour
- 1 tablespoon sugar
- 1/2 teaspoon Kosher salt
- 4 tablespoons 1/2 stick cold unsalted butter, cut into 3/4-inch pieces
- 3 tablespoons cold vegetable shortening cut into 3/4-inch pieces
- 3 tablespoons very cold water
Filling
- 4 tablespoons 1/2 stick unsalted butter, cut into 4 pieces
- 3/4 cup sugar
- 4 baking apples ~ 2 pounds – such as Granny Smith or Golden Delicious, peeled cored and each side cut into quarters lengthwise
- For Serving: vanilla ice cream for serving optional
Instructions
Make Dough:
- To make the dough in a food processor, combine flour, sugar and salt in the bowl and pulse to blend. Add butter and shortening and pulse until reduced to 1/2-inch pieces. Add water a little at a time and pulse until the dough just begins to come together in a rough mass. You may not need all of the water.
- To make the dough by hand, combine flour, sugar and salt in a bowl. Add butter and shortening and toss to coat with flour mixture. Using a pastry blender or 2 knives, cut the pieces of fat into flour mixture until they are no larger than small peas. Dribble the water over the mixture and toss with a fork until dough is evenly moist and begins to come together in a rough mass. You may not need all of the water.
- Transfer dough to a work surface and shape into a 5-inch disk. Wrap with plastic wrap and refrigerate until well chilled, at least 2 hours and as long as 24 hours.
- While apples are cooking on top of the stove, lightly dust a work surface and a rolling pin with flour. Roll out chilled dough into a 12-inch round, a scant 1/4-inch thick. Lift and turn the dough several times as you roll to prevent sticking, and dust the surface and the rolling pin with additional flour as needed. Use a dough scraper or icing spatula to loosen the pastry if it sticks. Trim dough into an 11-inch round. Use immediately or slide a rimless baking sheet under dough, cover with plastic wrap and refrigerate until needed.
Make Filling:
- Preheat an oven to 375°F.
- Set a Tarte Tatin pan or a 9 or 10-inch straight-sided, ovenproof frying pan (preferably cast iron) over medium heat and heat butter. When it melts, sprinkle the sugar evenly over the butter and continue cooking until sugar melts and turns amber colored, about 3 to 4 minutes. Shake and swirl pan frequently to redistribute sugar for even melting and caramelization. Watch it carefully so it doesn’t burn.
- Arrange apples, core side up, in the caramel in a snug, even layer. (It doesn’t have to look perfect and a reminder that the bottoms of the apples are what you'll see when the tarte is flipped over.) Increase heat to medium-high and cook until the apples are just tender, about 15 minutes. The caramel will bubble up around the apples. Watch it carefully so it doesn’t burn (adjust heat if necessary). Remove the pan from heat.
- Uncover pastry round. When bubbling has subsided, slide both hands under pastry round and carefully place it on top of the apples, tucking in the edges and being careful not to burn your fingers. Bake until crust is golden brown, about 30 minutes.
- Transfer the pan to a wire rack and let cool for 5 minutes. Place a large flat serving plate upside down on top of the pan and invert the pan and plate together. Lift off the pan.
- Slice and serve warm or at room temperature with vanilla ice cream.
Notes
Source: Adapted from Abigail Johnson Dodge’s Williams-Sonoma Collection Series, Dessert (2002)

Best apple dessert ever!
Dad – Agree! Nothing else compares.
I am so glad that you give the history and that you should mention the tradition of tarte tatin being apples… everything now is a tarte tatin and it drives me crazy. I will go along with pears (same family) but I literally saw an escargot tarte tatine recipe the other day! Seriously? I am about to post an upside down tart but refuse to call it a Tatin. I think “les Soeurs Tatin” would be proud of us! 🙂 Beautiful job with it, by the way!
David – I should have known you’d appreciate this! Like you, I have been seeing many ‘tarte tatins’ but not yet one made with escargot! That’s simply crazy.