How often have you bought buttermilk for a recipe only to use a portion of it and then end up throwing the remainder away? This is the perfect solution for leftover buttermilk.
Most buttermilk containers are a minimum of four cups. Chances are you will have at least two cups leftover from whatever recipe you’re making. Why not use it to make an amazingly easy and delicious roast chicken?
I wrote about a fancier version of this chicken a few years ago in my Persian Roast Chicken post. This version is simply a whole chicken, buttermilk and salt. That’s it.
One thing that you need that you cannot buy is time. The success of this recipe depends on you brining (or marinating) the chicken for at least 24 hours prior to cooking it. This process tenderizes the chicken and keeps it moist while cooking.
In reading Samin Nosart’s Salt, Fat, Acid, Heat: Mastering the Elements of Good Cooking (2017) I truly learned that not all salts are created equal. This is even the case for Kosher salts. The two most popular brands are Diamond Crystal and Morton. One tablespoon of Diamond Crystal is equal to about 1-3/4 teaspoons of Morton Kosher salt (a reminder that three teaspoons is one tablespoon). When I first discovered Diamond Crystal I had to order it online as I couldn’t find it in my local grocery stores – now it is readily available. Nosart prefers to use Diamond Crystal as it dissolves more quickly so you’re less likely to oversalt a dish and due to its larger surface area it’s more likely to stick to foods. If it works for her, it works for me.
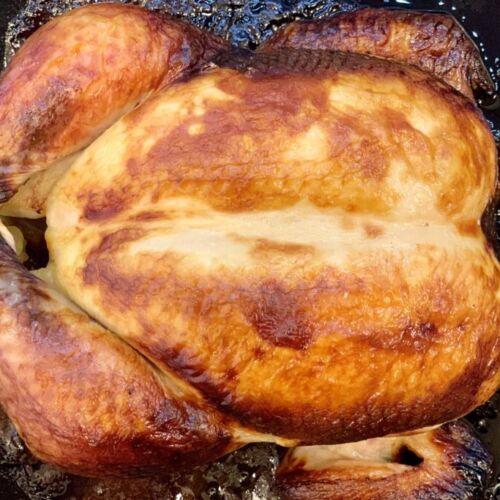
Set aside about 2-1/2 hours on the day you’re cooking this chicken. This includes an hour for the chicken to sit at room temperature and the remaining time for cooking. I cooked this chicken on the ‘convection roast’ setting in my oven. See the ‘Notes’ in the recipe about adjusting the oven temperature. The end result was a nice crisp skin and tender and moist meat. Sometimes simple is the best.

Buttermilk Brined Roast Chicken
Ingredients
- 1 3-1/2 to 4-1/2 pound organic chicken
- 2 cups buttermilk
- 2 tablespoon Kosher salt or 4 teaspoons fine sea salt for brine plus extra for initial seasoning see notes
Instructions
The day before cooking the chicken:
- If you like, remove the wingtips by cutting through the first wing joint with poultry shears or a sharp knife. Reserve for stock. (I usually skip this step.)
- Season the chicken generously with salt and let it sit for 30 minutes.
- In a medium bowl or measuring cup, stir 2 tablespoons of kosher salt or 4 teaspoons of fine sea salt into the buttermilk to dissolve.
- Remove chicken from packaging and ensure there’s no parts stored in the cavity of the chicken.
- Place chicken in a two gallon ziplock bag and add brining mixture. Seal bag and squish mixture all around chicken. Place in the refrigerator for at least 24 hours. If you think of it, squish the mixture around the chicken a few times during the 24 hours.
The day you’re cooking the chicken:
- Remove chicken from the refrigerator an hour before you’re going to cook it and let it sit at room temperature.
- Preheat the oven to 450°F and place the rack in the center of the oven. (See notes for suggested convection oven temperatures.)
- After an hour has passed, remove chicken from the bag and wipe off as much of the brining mixture as possible. Place chicken breast side up in a 10-inch (or larger) cast iron frying pan (or shallow roasting pan). Tightly tie together the legs of the chicken with a piece of cooking twine.
- Slide pan all the way to the back of the oven. Rotate the pan so the legs are pointing towards the back left corner and the breast is pointing towards the center of the oven (essentially the pan should take up the back left quadrant of the oven). The chicken will start to sizzle and brown almost immediately.
- After 20 minutes, reduce the temperature to 400°F.
- After another 10 minutes, rotate the chicken so that the legs are pointing towards the back right corner of the oven.
- Continue cooking for another 30 minutes or so (depends on the size of the chicken). Chicken is done when it’s brown all over and reaches an internal temperature of 165°F (instant-read thermometer inserted into thickest part of the thigh but not touching bone). (Alternately when juices run clear when a knife is inserted down the bone between the leg and thigh.)
- Let chicken rest at room temperature (uncovered) for 10 minutes before carving and serving.
Notes
* You can find 2 gallon ziplock bags at your grocery store. I keep them on hand for occasions just like this.
* On the day you cook the chicken, it takes about 2-1/4 to 2-1/2 hours until the chicken is cooked (that includes the hour out of the refrigerator).
* I used the ‘convection roast’ setting for my oven and it came out perfectly. I lowered the temperature by 25 degrees – started at 425°F and lowered it to 375°F. Typically for the ‘convection roast’ setting you need to adjust the temperature whereas on newer ovens you do not need to for the ‘convection bake’ setting. I’ve read my oven’s manual a few times!
Source: Adapted from Samin Nosart’s Salt, Fat, Acid, Heat: Mastering the Elements of Good Cooking (2017)

Leave A Comment